
Getting started with the Water Tester
Step-1

Insert the batteries, close the battery cover, and tighten the cover screws to ensure it is tight and leak-proof. Use only disposable AA alkaline batteries. Never use any other type of batteries, as this will immediately damage the device!

Step-3
Please note that double pressing the Bluetooth button must be done at the moment when the device screen displays ZERO or TEST or SINGLE. In case the display shows a phone and the tester after double pressing the WiFi/Bluetooth button, you need to press the Zero button once to return to the previous menu, and then repeat a very quick double press of the Bluetooth button to turn on Bluetooth! The Bluetooth icon needs to light in green.

Very fast Double-click the button with the WiFi/Bluetooth icon to turn on Bluetooth. As a result of this Very fast double-click the color of the Bluetooth icon in the upper left corner will change from white to green!
Step-4
Install the LabCom app on your smartphone according to your operating system.
For Android users: Please make sure that the LabCOM app has been granted the 'Location detection' permission. The PoolWaterLAB uses Bluetooth 4.2. On Android the app needs the location permission to scan for PoolWaterLABs. Depending on the Android version, Google also requires location to be enabled on the smartphone. Additionally, the PoolWaterLAB uses a protocol that does not support pairing in the Android settings.
Make sure that the app has the location permission (Settings > Apps > LabCom > Permissions > Location), that this is enabled in the settings (or the status bar menu) and that Bluetooth is enabled on the PoolWaterLAB itself.
We do not collect any location data, but the permission is only required for using Bluetooth 4.2 within the app. is the link to the Android documentation: https://developer.android.com/guide/topics/connectivity/bluetooth#Permissions
Step-5
Open the App
Step-6
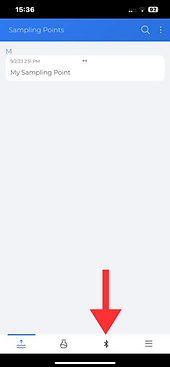
Tap the Bluetooth icon
Step-7
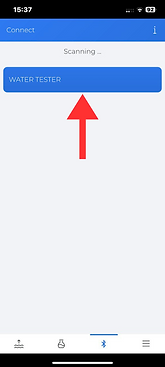
Tap “WaterTester”
Step-8
At this point, you might be asked to update your device. If so, please run the update! (might take up to 12 minutes!)If your phone is in 'low power' mode it may interrupt the update.
Step-9
Tap the spanner icon next to 'Sampling points'.

Step-10
Check the box for max. 20 measuring sources to be transferred to the Water Tester. Tap OK. After this step, the tester is set up and will automatically sync via Bluetooth each time it connects.

Step-11
Tap the Menu button

Step-12
Tap the Cloud Service icon

Step-13
Tap the Signup icon and follow the instructions to create your account

Step-14
Tap the Bluetooth icon

Step-15
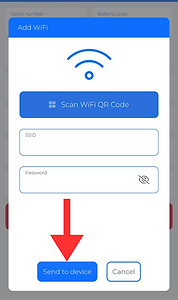
Connect to your Wi-Fi network

Step-16
Enter the network name and password, then tap 'Send to Device'.
Create/change the sampling point
Step-17
Tap the menu icon of the sampling point

Step-18
Tap the three dots in the upper right corner

Step-19
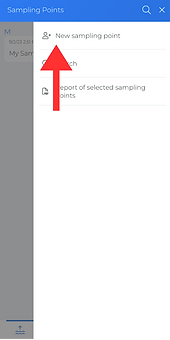
Tap 'Add New Sampling Point'
Step-20
Fill in the first two fields (required). All other fields are optional.

Step-21
Tap the disc icon in the upper right corner to save

Step-22
Once the cloud is fully configured, simply press the Bluetooth button on the Water Tester to send its data to the cloud
