
Complete viewing required: every step is crucial to obtain results
Calcium Hardness: 0 – 500 ppm (mg/l)
Use Liquid Reagents Calcium Hardness N°1* + Calcium Hardness N°2*.
Measurements only in chamber №2!!!
6-CH
Step-1
• Make sure the measuring chambers are clean beforehand.
• Rinse them with the water you are going to test.
• Turn on the Water Tester using the power button.

Measuring chamber
Power button
Step-2
• Use the special syringe to add 10 ml of water to each of the three measuring chambers.
OR
- Fill the cuvette directly from the water source you are testing.
- Insert the Water Leveler into the chamber.
- Excess water will drain via side channels, leaving exactly 10 ml in each chamber.
Special syringe or Water Leveler


Step-3
• Cover the measuring chamber with the light protection cap.
• Press the ZERO button.
Light protection cap
ZERO button

ZERO
Step-4
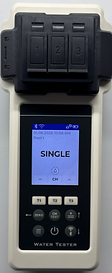
• Press the T2 button to go to the selection menu for the test parameters.
The T1/T2/T3 button functions:
– Single click: add a parameter.
– Double quick click: remove a parameter.
– Long press (count to three): open the parameter list.

Step-5
-
Use the up and down buttons to select the desired parameter for measurement.
Up and down buttons

Step-6
• After selecting the desired parameter, click the OK button to confirm your selection.
OK button

Step-7
• Shake liquid reagent before use.
• Add reagent to chamber №2.
Add 10 drops of Calcium Hardness N°1 + 10 drops
Calcium Hardness N°2.


Step-8
• Using special stirring stick, stir to mix the reagent with the water sample.
Special stirring stick

Step-9
• Cover the measuring chamber with the light protection cap.
• Press the OK button to start the 10-minute countdown. (At this stage, a reaction occurs with the reagent, resulting in the formation of a precipitate.)
• Wait until the countdown ends, then proceed with step 10.
Light protection cap
Ok button
Step-10
• Using a special stirring stick, stir again to mix the precipitate with the water sample.
Special stirring stick

Step-11
• Cover the measuring chamber with the light protection cap.
• Press the T2 button and wait for the test result to appear.
Light protection cap

T2 button
If you want to upload the test results to the cloud, press the Back button (which also functions as Zero). The word “Test” will appear on the screen — then press the Bluetooth/Wi-Fi button.
Tolerances +-10%
